To develop Twin, a Ruby library that wraps your app in a Twitter API, I had to monitor my iPhone’s HTTP traffic to figure out which resources does the Twitter app consume. While doing this, it occurred to me that I can figure out the unpublished Instagram API in the same go.
Instagram is a free, neat little photo app that lets you apply vintage filters and share your mobile snaps to people who follow you. But, alas, the service has almost no web presence as it’s not possible to link to or browse your or other’s photo streams.
So, in a single day I’ve sniffed out the Instagram API, fully documented it, created a Ruby client and put it to good use in a mini web app [code] that acts as an unofficial Instagram web interface. In the next couple of days I sneaked in additional features such as pagination, Atom feeds and a JSONP proxy.
Update: Instagram has released their official API for developers, and I have deprecated my library and documentation accordingly.
After that there’s been a huge response on Twitter, and now I’m writing more about the technical aspects of how I did it.
Charles HTTP proxy: control your iPhone HTTP traffic like a pro
To monitor the HTTP traffic on both my computer and other Apple devices, I use Charles HTTP proxy. It’s a Java app that—don’t fear!—actually looks quite OK on Mac OS X. The price tag is not as small, but I find it indispensable in my everyday hacking habits. If you already use another tool such as Wireshark, that might be fine too, but Charles is top of the line when it comes to usability and advanced features.
When the application is turned on, Safari and Google Chrome will automatically use the proxy for requests. (Firefox users will need to install an extension.) However, iOS devices need a little more configuration to use the proxy.
To configure your device:
-
Ensure that your iOS device is on the same WiFi network as the computer running Charles. If your computer connects to the Internet via ethernet cable, create a new wireless network on your computer and have your device connect to it.
-
Figure out the IP address of your computer on this network. I use
ifconfig en1to find this out. -
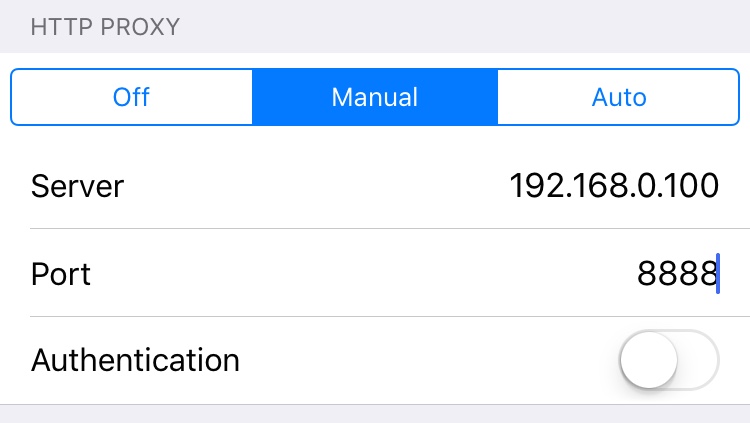
On the device, open the Wi-Fi network details in Settings. Scroll down to “HTTP Proxy”, switch to manual mode, enter the IP address of your main computer and “8888” for port number.
Now use your device to initiate some traffic. The first time it hits the proxy, Charles will ask you is it OK that this device uses it as a proxy (for security reasons). Once you confirm that, you’ll start collecting traffic. Use your device to read Twitter, open up Facebook, browse with Mobile Safari for a while. Then go back to Charles and see what you collected.
Some apps, like Twitter for iPhone, will communicate securely over HTTPS. Charles does not analyze this traffic by default, but you can enable it in “Proxy → Proxy Settings → SSL” by whitelisting some locations (such as “*.twitter.com”), reading about Charles SSL certificate and installing it in iOS.
My favorite Charles proxy features:
- breaks down requests and responses in separate views for cookies, GET/POST params, JSON/XML structure and more, depending on the request;
- creates a summary, either as a sortable table or chart, for any group of requests detailing sizes in kilobytes, response codes and response times;
- ability to repeat a request directly from the UI, even edit details (such as POST params) before repeating;
- ability to set “breakpoints” for certain requests, meaning the proxy will not let them through until you have inspected, possibly edited, and approved them;
- throttle traffic, simulating a bad Internet connection;
- disable HTTP caching for specified resources, making debugging servers and clients easier;
- save a whole session of captured traffic in a file, making it available for later inspection.
Writing the Ruby client library and web interface
After I’ve collected all information about how Instagram iPhone app uses their API, I’ve created a GitHub project and documented my findings on the wiki. New git-based wikis are great to create in the comfort of your text editor, and Charles makes it easy to copy request URLs or response bodies to clipboard by right-clicking in the UI.
I used gorgeous, one of my favorite tools, to prettify JSON data before pasting it in the docs:
$ pbpaste | gorgeous | pbcopyNow that I had a pretty good knowledge of how the API works, it was time to create a basic Ruby client. I skipped authentication and methods that need it, and concentrated only on the public resources for now. I’ve used Nibbler, my favorite piece of code I’ve ever written, to parse JSON structures into model objects, and URI templates to describe API endpoints.
# Nibbler used to describe the user model
class User < Base
  element :username
  element :full_name
  element 'profile_pic_url' => :avatar
  # ...
end
The web interface was obviously going to be written in Sinatra; I wanted to create something quick & dirty and push it to Heroku right away without burdening myself with a full-fledged framework, persistence or anything. It’s built for Ruby 1.9 and it won’t run on previous versions, although the client library is portable.
To be a good API citizen, I had to ensure I wasn’t going to choke Instagram servers with requests even if my web app becomes popular. I’ve used ActiveSupport::Cache to save each API response for 3 minutes before hitting it again. This way I ensured I’m not hitting a single resource of theirs more than 20 times per hour.
Second, I’ve put up HTTP expiry headers to take advantage of Varnish HTTP accelerator on Heroku. Some pages are cached for even up to 15 minutes, easing the load on Instagram servers even more.
# Sinatra response for Atom feed
content_type 'application/atom+xml', charset: 'utf-8'
expires 15.minutes, :public
last_modified @photos.first.taken_at if @photos.any?
builder :feed, layout: false
Finally, to ensure the web app stays up even if Instagram goes down, I wrote a special type of filesystem cache called the FailsafeStore that reuses stale cache in case rebuilding failed with exceptions such as HTTP failures or JSON parsing errors.
The whole web app (view templates, stylesheets and all) is under 500 lines of code, the client library is even smaller and published under the MIT license. As always with my code, I encourage you to dive in.